Elec·初级
|
# main.js 逐行分析
## 1-3 行:模块导入和配置加载
```javascript
const { app, BrowserWindow } = require('electron');
const path = require('path');
require('dotenv').config();
```
**语法解释**:
- `require('electron')`: 导入 Electron 模块
- `{ app, BrowserWindow }`: 解构赋值,从 electron 模块中提取 app 和 BrowserWindow 两个对象
- `require('path')`: 导入 Node.js 的 path 模块,用于处理文件路径
- `require('dotenv').config()`: 加载并解析 .env 配置文件
**作用**:
- `app`: Electron 的主进程模块,控制应用的生命周期
- `BrowserWindow`: 用于创建和管理浏览器窗口
- `path`: 提供路径处理工具(如 path.join)
- `dotenv`: 从 .env 文件读取环境变量到 process.env
---
## 4-5 行:读取环境变量
```javascript
const ELECTRON_DEV_URL = process.env.ELECTRON_DEV_URL || 'http://localhost:5173';
```
**语法解释**:
- `process.env`: Node.js 的全局对象,包含环境变量
- `||`: 逻辑或运算符,提供默认值
**作用**:
- 从 .env 文件中读取 `ELECTRON_DEV_URL` 变量
- 如果没有设置,则使用默认值 `http://localhost:5173`
- 这样可以在 .env 中灵活配置开发服务器地址
**读取逻辑**:
1. `dotenv.config()` 执行后,.env 文件中的变量被加载到 `process.env`
2. `process.env.ELECTRON_DEV_URL` 获取配置的值
3. 如果配置文件中没有此变量,使用默认值 `http://localhost:5173`
---
## 6 行:声明主窗口变量
```javascript
let mainWindow;
```
**作用**:
- 声明一个全局变量用于存储主窗口实例
- 使用 `let` 因为后续会重新赋值
---
## 8-14 行:单实例锁机制(重点)
```javascript
const gotTheLock = app.requestSingleInstanceLock();
if (!gotTheLock) {
app.quit();
return;
}
app.on('second-instance', (event, commandLine, workingDirectory) => {
if (mainWindow && !mainWindow.isDestroyed()) {
if (mainWindow.isMinimized()) mainWindow.restore();
mainWindow.focus();
}
});
```
**详细解释**:
### 8 行:请求单实例锁
```javascript
const gotTheLock = app.requestSingleInstanceLock();
```
**语法**:
- `app.requestSingleInstanceLock()`: Electron 应用实例锁方法
**作用**:
- 尝试获取应用的单实例锁
- 返回值:
- `true`: 成功获取锁(这是第一个实例)
- `false`: 获取失败(已经有实例在运行)
**为什么需要单实例锁?**
- 防止用户重复打开同一个应用
- 保证同时只有一个应用实例在运行
- 类似于 QQ、微信等应用的"只能运行一个实例"机制
### 9-12 行:处理多实例情况
```javascript
if (!gotTheLock) {
app.quit();
return;
}
```
**语法**:
- `!gotTheLock`: 逻辑非运算符,检查是否未获取锁
**执行逻辑**:
1. 如果 `gotTheLock` 为 `false`(说明已有实例运行)
2. 调用 `app.quit()` 退出当前新启动的实例
3. `return` 终止后续代码执行
**效果**:
- 第二次双击应用图标时,新实例会立即退出
- 不会出现两个相同的应用窗口
### 13-17 行:second-instance 事件监听(重点)
```javascript
app.on('second-instance', (event, commandLine, workingDirectory) => {
if (mainWindow && !mainWindow.isDestroyed()) {
if (mainWindow.isMinimized()) mainWindow.restore();
mainWindow.focus();
}
});
```
**语法**:
- `app.on('second-instance', callback)`: 注册事件监听器
- 事件触发时机:**当第二个实例尝试启动并被单实例锁阻止时**
**参数说明**:
- `event`: 事件对象
- `commandLine`: 第二个实例的命令行参数数组
- `workingDirectory`: 第二个实例的工作目录
**second-instance 在哪里使用?**
**场景描述**:
1. **用户第一次双击应用图标** → 第一个实例启动,获得锁
2. **用户第二次双击应用图标** → 第二个实例尝试启动
3. 第二个实例执行 `app.requestSingleInstanceLock()` → 返回 `false`
4. 第二个实例执行 `app.quit()` → 退出
5. **第一个实例收到 `second-instance` 事件** → 执行回调函数
**回调函数逻辑**:
```javascript
if (mainWindow && !mainWindow.isDestroyed()) {
// 如果主窗口存在且未被销毁
if (mainWindow.isMinimized()) mainWindow.restore();
// 如果窗口最小化了,恢复到正常状态
mainWindow.focus();
// 将焦点设置到主窗口(窗口置顶)
}
```
**实际效果**:
```
用户操作:
1. 启动应用(第一个窗口)
2. 最小化应用窗口
3. 再次双击应用图标
结果:
- 不会打开新窗口
- 原窗口从最小化恢复
- 原窗口获得焦点并置顶
```
**为什么这样设计?**
- 提供更好的用户体验
- 避免用户误操作打开多个窗口
- 类似微信、QQ 的行为逻辑
---
## 19-42 行:创建窗口函数
```javascript
function createWindow() {
mainWindow = new BrowserWindow({
width: 1200,
height: 800,
icon: path.join(__dirname, 'public/icon.png'),
webPreferences: {
preload: path.join(__dirname, 'preload.js'),
contextIsolation: true,
enableRemoteModule: false,
nodeIntegration: false
}
});
mainWindow.setMenuBarVisibility(false);
const isDev = process.env.NODE_ENV === 'development' ||
process.env.NODE_ENV === undefined ||
!app.isPackaged;
if (isDev) {
mainWindow.loadURL(ELECTRON_DEV_URL);
mainWindow.webContents.openDevTools();
} else {
mainWindow.loadFile(path.join(__dirname, 'dist/index.html'));
}
}
```
**关键点**:
### 20-28 行:BrowserWindow 配置
```javascript
new BrowserWindow({
width: 1200,
height: 800,
icon: path.join(__dirname, 'public/icon.png'),
webPreferences: {
preload: path.join(__dirname, 'preload.js'),
contextIsolation: true,
enableRemoteModule: false,
nodeIntegration: false
}
})
```
**配置说明**:
- `width/height`: 窗口尺寸
- `icon`: 应用图标(使用 path.join 拼接路径)
- `webPreferences`: Web 内容首选项
- `preload`: 预加载脚本
- `contextIsolation`: 上下文隔离(安全特性)
- `nodeIntegration`: 禁用 Node.js 集成(安全)
- `enableRemoteModule`: 禁用 remote 模块(安全)
### 33-36 行:环境判断
```javascript
const isDev = process.env.NODE_ENV === 'development' ||
process.env.NODE_ENV === undefined ||
!app.isPackaged;
```
**判断逻辑**(满足任一条件即为开发环境):
1. `NODE_ENV === 'development'`: 显式设置为开发环境
2. `NODE_ENV === undefined`: 未设置环境变量(通常是开发时)
3. `!app.isPackaged`: 应用未打包(开发时)
### 38-41 行:加载不同页面
```javascript
if (isDev) {
mainWindow.loadURL(ELECTRON_DEV_URL);
mainWindow.webContents.openDevTools();
} else {
mainWindow.loadFile(path.join(__dirname, 'dist/index.html'));
}
```
**开发环境**:
- 加载 Vite 开发服务器(http://localhost:5173)
- 自动打开开发者工具
**生产环境**:
- 加载打包后的 HTML 文件(dist/index.html)
---
## 44-52 行:应用生命周期
```javascript
app.whenReady().then(() => {
createWindow();
app.on('activate', () => {
if (BrowserWindow.getAllWindows().length === 0) createWindow();
});
});
app.on('window-all-closed', () => {
if (process.platform !== 'darwin') {
app.quit();
}
});
```
**whenReady**:
- 应用准备就绪时触发
- 执行 `createWindow()` 创建窗口
**activate**:
- macOS 特有事件
- 点击 Dock 图标时触发
- 如果没有窗口,创建新窗口
**window-all-closed**:
- 所有窗口关闭时触发
- 非 macOS 系统(Windows/Linux)退出应用
- macOS 不退出(用户通常用 Cmd+Q 退出)
---
## .env 配置文件读取和使用流程
### 读取过程
```
1. main.js 执行
↓
2. require('dotenv').config()
↓
3. dotenv 读取项目根目录的 .env 文件
↓
4. 解析 .env 内容,将键值对写入 process.env
↓
5. 后续代码通过 process.env 访问配置
```
### .env 文件内容
```env
# Electron 配置
ELECTRON_DEV_URL=http://localhost:5173
# 应用配置
NODE_ENV=development
```
### 使用方式
**在 main.js 中**:
```javascript
// 1. 加载配置
require('dotenv').config();
// 2. 使用配置
const devUrl = process.env.ELECTRON_DEV_URL;
const isDev = process.env.NODE_ENV === 'development';
```
**在 Vue 组件中**:
```javascript
// Vite 自动注入 VITE_ 前缀的变量
const apiUrl = import.meta.env.VITE_API_BASE;
```
### 配置优先级
```
环境变量 > .env 文件 > 代码默认值
```
示例:
```javascript
const url = process.env.ELECTRON_DEV_URL || 'http://localhost:5173';
// 1. 先查找 process.env.ELECTRON_DEV_URL
// 2. 如果不存在,使用默认值
```
---
## 完整执行流程
```
应用启动
↓
1. 加载模块 (electron, path, dotenv)
↓
2. 读取 .env 配置到 process.env
↓
3. 从环境变量获取 ELECTRON_DEV_URL
↓
4. 请求单实例锁
├─ 成功 → 继续启动
└─ 失败 → 退出当前实例,通知已运行实例
↓
5. 注册 second-instance 事件
↓
6. 等待 app.whenReady
↓
7. 创建主窗口
├─ 判断环境(开发/生产)
└─ 加载对应页面
↓
8. 注册生命周期事件
- activate: macOS 点击 Dock 图标
- window-all-closed: 窗口关闭处理
```
---
## 安全配置说明
```javascript
webPreferences: {
contextIsolation: true, // 上下文隔离:渲染进程和主进程隔离
nodeIntegration: false, // 禁用 Node.js 集成:渲染进程不能直接使用 Node API
enableRemoteModule: false // 禁用 remote 模块:防止远程代码执行
}
```
**为什么这样配置?**
- 防止恶意代码利用 Electron 的强大功能
- 减少攻击面
- 遵循 Electron 安全最佳实践
---
## 总结
**main.js 的核心职责**:
1. 导入必要的模块和配置
2. 实现单实例机制
3. 创建和管理应用窗口
4. 根据环境加载不同页面
5. 处理应用生命周期事件
**关键技术点**:
- 单实例锁机制
- 环境变量配置
- 开发/生产环境区分
- 安全配置
|
|
## 环境变量分析
### 1. dotenv.config() 的工作原理
**默认行为**:
- `require('dotenv').config()` 默认读取项目根目录下的 `.env` 文件
- 如果文件不存在,不会报错,只是不会加载任何变量
**文件位置**:
- 默认路径:`path.resolve(process.cwd(), '.env')`
- `process.cwd()` 返回 Node.js 进程的当前工作目录
**手动指定文件**:
```javascript
// 指定自定义路径
require('dotenv').config({ path: './config/.env' });
// 指定多个文件
require('dotenv').config({ path: './.env.local' });
```
**加载过程**:
1. 读取 `.env` 文件内容
2. 解析每一行的 `KEY=VALUE` 格式
3. 将解析后的键值对赋值给 `process.env`
4. 如果 `process.env` 中已有同名变量,不会覆盖(除非指定 override)
**赋值机制**:
```javascript
// dotenv 内部大致逻辑
const envVars = parseEnvFile('.env');
Object.assign(process.env, envVars);
```
### 2. process.env 和 process.platform 的归属
**process 对象**:
- `process` 是 **Node.js** 的全局对象
- Electron 基于 Node.js 构建,主进程运行在 Node.js 环境中
- 因此,在 Electron 主进程中,`process` 就是 Node.js 的 `process` 对象
**process.env**:
- `process.env` 是 Node.js 的环境变量对象
- 包含系统环境变量和通过 dotenv 等工具添加的变量
- 在 Electron 中完全相同,没有区别
**process.platform**:
- `process.platform` 是 **Node.js** 的平台检测属性
- 返回当前运行平台的标识符:
- `'win32'` (Windows)
- `'darwin'` (macOS)
- `'linux'` (Linux)
- 在 Electron 中使用方式完全相同,因为 Electron 进程就是 Node.js 进程
**Electron vs Node.js 关系**:
- Electron = Node.js + Chromium + Native APIs
- 主进程:纯 Node.js 环境,可以使用所有 Node.js APIs
- 渲染进程:Chromium 环境,类似浏览器,但可以通过 preload 脚本访问部分 Node.js APIs
**结论**:
- `process.env` 和 `process.platform` 都是 **Node.js** 的
- Electron 继承了 Node.js 的所有特性
- 在 Electron 主进程中,它们的工作方式与纯 Node.js 应用完全相同
### 3. 文件中的环境变量使用示例
```javascript
// 1. 加载 .env 文件
require('dotenv').config();
// 2. 使用环境变量
const ELECTRON_DEV_URL = process.env.ELECTRON_DEV_URL || 'http://localhost:5173';
// 3. 平台检测
if (process.platform === 'win32') {
// Windows 特定配置
}
// 4. 环境判断
const isDev = process.env.NODE_ENV === 'development';
```
**环境变量优先级**:
1. 系统环境变量(最高优先级)
2. .env 文件中的变量
3. 代码中的默认值(最低优先级)
|
|
## 环境变量·import.meta.env (Vite)
### 1. 基本用法
```typescript
// 代码示例
export const baseURL = import.meta.env.VITE_API_BASE;
```
**这行代码的作用**:
- 从 Vite 构建工具的环境变量中读取 `VITE_API_BASE` 的值
- 将其赋值给 `baseURL` 常量并导出
- 在前端代码中可以通过 `import.meta.env.VITE_*` 访问环境变量
**.env 文件配置**:
```env
VITE_API_BASE=http://127.0.0.1:8888/api/v1
VITE_API_KEY=your_api_key_here
```
---
### 2. Vite 环境变量特性
#### 命名约定
- 只有以 **`VITE_`** 开头的变量才能在客户端代码中访问
- 这是 Vite 的安全机制,防止敏感信息泄露
```typescript
// ✅ 可以访问(VITE_ 前缀)
const apiUrl = import.meta.env.VITE_API_BASE;
const apiKey = import.meta.env.VITE_API_KEY;
// ❌ 无法访问(没有 VITE_ 前缀)
const dbUrl = import.meta.env.DATABASE_URL; // undefined
const secret = import.meta.env.SECRET_KEY; // undefined
```
#### 构建时替换
- Vite 在构建时会将 `import.meta.env.VITE_*` 替换为实际的字符串值
- 不是运行时读取,而是编译时内联
**构建前**:
```typescript
const baseURL = import.meta.env.VITE_API_BASE;
console.log(baseURL);
```
**构建后**:
```javascript
const baseURL = "http://127.0.0.1:8888/api/v1";
console.log(baseURL);
```
---
### 3. 与 `require('dotenv').config()` 的区别
| 特性 | `import.meta.env` (Vite) | `require('dotenv').config()` (Node.js) |
|------|--------------------------|----------------------------------------|
| **运行环境** | 前端/浏览器 | 后端/Node.js |
| **构建工具** | Vite | 任何 Node.js 项目 |
| **变量访问** | `import.meta.env.VITE_*` | `process.env.*` |
| **命名约定** | 必须以 `VITE_` 开头 | 无特殊要求 |
| **作用时机** | 构建时替换(编译时) | 运行时读取 |
| **类型支持** | 原生 TypeScript 支持 | 需要 `@types/node` |
| **打包后** | 变量值被内联到代码中 | 需要运行时读取 .env 文件 |
| **安全性** | 只有 `VITE_` 开头的变量会暴露到客户端 | 所有环境变量都暴露 |
| **使用场景** | Vue/React 前端项目 | Express/Koa 后端项目、Electron 主进程 |
---
### 4. 使用场景对比
#### Vite 前端项目(Vue 3 + TypeScript)
```typescript
// .env
VITE_API_BASE=http://127.0.0.1:8888/api/v1
VITE_API_KEY=abc123
// src/api/index.ts
export const baseURL = import.meta.env.VITE_API_BASE;
// 构建后: export const baseURL = "http://127.0.0.1:8888/api/v1";
// src/config.ts
export const config = {
apiUrl: import.meta.env.VITE_API_BASE,
apiKey: import.meta.env.VITE_API_KEY
};
```
#### Node.js 后端项目(Express/Koa)
```javascript
// .env
API_BASE=http://localhost:8888
API_KEY=abc123
DATABASE_URL=postgresql://localhost/mydb
// server.js
require('dotenv').config();
const apiUrl = process.env.API_BASE;
const apiKey = process.env.API_KEY;
const dbUrl = process.env.DATABASE_URL;
```
#### Electron 主进程(Node.js 环境)
```javascript
// main.js
require('dotenv').config();
const devUrl = process.env.ELECTRON_DEV_URL || 'http://localhost:5173';
const isDev = process.env.NODE_ENV === 'development';
```
#### Electron + Vite 渲染进程(前端环境)
```typescript
// .env
VITE_API_BASE=http://127.0.0.1:8888/api/v1
// preload.ts
import { contextBridge, ipcRenderer } from 'electron';
contextBridge.exposeInMainWorld('electronAPI', {
// 从环境变量读取配置
apiBase: import.meta.env.VITE_API_BASE
});
// renderer.ts
const apiBase = window.electronAPI.apiBase;
```
---
### 5. 实际应用示例
#### 示例1:API 请求配置
```typescript
// src/api/index.ts
export const baseURL = import.meta.env.VITE_API_BASE;
export const request = axios.create({
baseURL: baseURL,
timeout: 10000
});
// 使用
export const userApi = {
getUsers: () => request.get('/users'),
createUser: (data) => request.post('/users', data)
};
```
#### 示例2:环境区分
```typescript
// .env.development
VITE_API_BASE=http://localhost:8888/api/v1
VITE_DEBUG_MODE=true
// .env.production
VITE_API_BASE=https://api.example.com/api/v1
VITE_DEBUG_MODE=false
// src/config.ts
export const config = {
apiBase: import.meta.env.VITE_API_BASE,
debugMode: import.meta.env.VITE_DEBUG_MODE === 'true',
isDev: import.meta.env.DEV // Vite 内置变量
};
```
#### 示例3:TypeScript 类型定义
```typescript
// src/env.d.ts
///
|
|
### 启动时控制台输出乱码
```
"scripts": {
"elec:dev:win": "run-electron.bat",
},
```
- run-electron.bat
```
@echo off
REM 保存原始PATH
set "ORIGINAL_PATH=%PATH%"
REM 设置新的PATH(确保能找到系统命令)
set "PATH=%SystemRoot%\system32;%SystemRoot%;%SystemRoot%\System32\Wbem;%ORIGINAL_PATH%"
REM 设置控制台编码为 UTF-8 (65001)
chcp 65001 >nul
REM 设置环境变量
set NODE_ENV=development
REM 启动 Electron
electron .
```
- 修改前后启动日志:闪电符不再是乱码
```
PS D:\wks\elec> yarn run electron
yarn run v1.22.22
$ cross-env NODE_ENV=development electron .
[dotenv@17.3.1] injecting env (4) from .env -- tip: 鈿欙笍 suppress all logs with { quiet: true }
[13428:0309/155032.768:ERROR:gpu_init.cc(523)] Passthrough is not supported, GL is disabled, ANGLE is
PS D:\wks\elec> D:\wks\elec\node_modules\electron\dist\electron.exe exited with signal SIGINT
PS D:\wks\elec> yarn run elec:dev:win
yarn run v1.22.22
$ run-electron.bat
[dotenv@17.3.1] injecting env (4) from .env -- tip: 🤖 agentic secret storage: https://dotenvx.com/as2
[Platform] Windows detected
[Encoding] UTF-8 mode enabled
[Node.js] v18.12.1
[Electron] 23.3.13
[15736:0309/160724.934:ERROR:gpu_init.cc(523)] Passthrough is not supported, GL is disabled, ANGLE is
```
|
|
### GPU 错误信息解读
启动 Electron 时可能出现以下 GPU 相关错误:
```bash
[14848:0309/155912.945:ERROR:gpu_init.cc(523)] Passthrough is not supported, GL is disabled, ANGLE is
```
| 术语 | 含义 |
|------|------|
| **Passthrough (直通渲染)** | 一种 GPU 渲染模式,直接使用系统的 OpenGL |
| **GL is disabled** | OpenGL 被禁用 |
| **ANGLE** | Windows 上使用的 OpenGL 翻译层(将 OpenGL 调用转换为 DirectX) |
---
### GPU 状态说明
| 状态 | 说明 |
|------|------|
| ⚠️ **警告信息** | 正常,不影响功能 |
| ✅ **GPU 加速** | 已启用(使用 ANGLE) |
| ❌ **性能影响** | 无明显影响 |
| ❌ **是否需要修复** | 不需要 |
**原理**:
- Electron 尝试使用 "passthrough" 模式失败
- 自动回退到 **ANGLE (DirectX)** 模式
- **GPU 加速仍然启用**,只是使用了不同的渲染路径
- 这在 Windows 上是标准做法
---
### GPU 加速配置
在 `main.js` 中添加了以下 GPU 加速优化:
```javascript
// GPU 加速配置 - 针对不同平台优化
if (process.platform === 'win32') {
// Windows 平台 GPU 配置
app.commandLine.appendSwitch('enable-features', 'VaapiVideoDecoder');
app.commandLine.appendSwitch('disable-software-rasterizer');
// 启用硬件加速
app.commandLine.appendSwitch('enable-gpu-rasterization');
app.commandLine.appendSwitch('enable-zero-copy');
} else if (process.platform === 'darwin') {
// macOS 平台 GPU 配置
app.commandLine.appendSwitch('enable-gpu-rasterization');
app.commandLine.appendSwitch('enable-zero-copy');
}
```
| 参数 | 作用 |
|------|------|
| `enable-gpu-rasterization` | 启用 GPU 光栅化 - 使用 GPU 渲染网页内容 |
| `disable-software-rasterizer` | 禁用软件渲染器 - 强制使用硬件加速 |
| `enable-zero-copy` | 零拷贝优化 - 提升 GPU 性能 |
| `VaapiVideoDecoder` | 硬件视频解码加速 |
---
### 启动日志示例
成功启动后的控制台输出:
```bash
[dotenv@17.3.1] injecting env (4) from .env -- tip: 🤖 agentic secret storage: https://dotenvx.com/as2
[Platform] Windows detected
[Encoding] UTF-8 mode enabled
[Node.js] v18.12.1
[Electron] 23.3.13
[GPU Status] Hardware acceleration enabled
[GPU Status] Renderer: ANGLE (DirectX)
```
---
### 验证 GPU 是否工作
在应用窗口中按 **Ctrl+Shift+I** 打开开发者工具,在 Console 中输入:
```javascript
// 查看逻辑核心数
navigator.hardwareConcurrency
```
这将显示你的 CPU 逻辑核心数,可以作为系统性能的参考指标。
---
### GPU 渲染模式对比
| 渲染模式 | 说明 | 使用场景 |
|---------|------|---------|
| **Passthrough** | 直接使用 OpenGL | Linux 某些发行版 |
| **ANGLE** | OpenGL → DirectX 转换 | Windows(默认) |
| **Software** | CPU 软件渲染 | 无 GPU 或 GPU 不可用 |
你的 Windows 系统使用 **ANGLE** 模式,这是正常且推荐的方式。
|
|
|
|
|
|
|
项目结构
|
### 前置条件
- 启动mysql数据库:
- fastapi项目依赖mysql数据库,
- 启动过程中使用数据库迁移工具进行数据库结构的更新和维护。
- 进入uv虚拟环境
-
```
cd D:\wks\elec\fastapi
.\.venv\Scripts\activate
python .\dev.py
```
|
|
## env
- 环境变量位置, 第1级:D:\wks\elec\.env
```
# Vite 开发服务器配置
VITE_PORT=12331
VITE_HOST=0.0.0.0
```
- 第2级:vite文件,
```
server: {
port: Number(env.VITE_PORT) || 12331,
proxy: {
'/api/v1': {
target: env.VITE_API_BASE || 'http://127.0.0.1:8888',
changeOrigin: true
}
}
},
```
|
|
- D:\wks\xy\elec\elecv1\main.js
- electron 入口
- D:\wks\xy\elec\elecv1\src\main.ts
- vue入口
|
|
|
|
|
|
|
|
|
|
|
db·alembic
|
## alembic初始化
在项目根目录执行以下命令:
```bash
cd /home/xt/wks/chat/v1
alembic init alembic
```
这将创建以下目录结构:
```
alembic/
├── env.py # 环境配置(运行时上下文)
├── script.py.mako # 迁移脚本模板
└── versions/ # 存放迁移版本文件
alembic.ini # Alembic 配置文件
```
## Alembic结构与位置
- 通常是在src同目录下创建一个alembic文件夹,里面包含env.py和versions文件夹
- alembic.ini
- alembic
- env.py
- versions
- src
- alembic执行:需要在alembic.ini文件的同目录下执行命令,才能正确识别配置文件和env.py
```
$ which alembic
/home/xt/wks/chat/v1/.venv/bin/alembic
$ alembic current
INFO [alembic.runtime.migration] Context impl MySQLImpl.
INFO [alembic.runtime.migration] Will assume non-transactional DDL.
afbd63a745fb (head)
$ alembic upgrade head
INFO [alembic.runtime.migration] Context impl MySQLImpl.
INFO [alembic.runtime.migration] Will assume non-transactional DDL.
```
|
|
在项目根目录创建 `alembic.ini` 文件:
- 如果按之前的目录结构,alembic.ini中的内容不需要修改,因为默认配置已经正确指向了env.py和versions目录
### 示例1
```
# A generic, single database configuration.
[alembic]
# path to migration scripts.
# this is typically a path given in POSIX (e.g. forward slashes)
# format, relative to the token %(here)s which refers to the location of this
# ini file
script_location = %(here)s/alembic
# template used to generate migration file names; The default value is %%(rev)s_%%(slug)s
# Uncomment the line below if you want the files to be prepended with date and time
# see https://alembic.sqlalchemy.org/en/latest/tutorial.html#editing-the-ini-file
# for all available tokens
# file_template = %%(year)d_%%(month).2d_%%(day).2d_%%(hour).2d%%(minute).2d-%%(rev)s_%%(slug)s
# sys.path path, will be prepended to sys.path if present.
# defaults to the current working directory. for multiple paths, the path separator
# is defined by "path_separator" below.
prepend_sys_path = .
# timezone to use when rendering the date within the migration file
# as well as the filename.
# If specified, requires the python>=3.9 or backports.zoneinfo library and tzdata library.
# Any required deps can installed by adding `alembic[tz]` to the pip requirements
# string value is passed to ZoneInfo()
# leave blank for localtime
# timezone =
# max length of characters to apply to the "slug" field
# truncate_slug_length = 40
# set to 'true' to run the environment during
# the 'revision' command, regardless of autogenerate
# revision_environment = false
# set to 'true' to allow .pyc and .pyo files without
# a source .py file to be detected as revisions in the
# versions/ directory
# sourceless = false
# version location specification; This defaults
# to
|
|
|
|
|
|
|
|
|
|
|
|
|
debug·F12
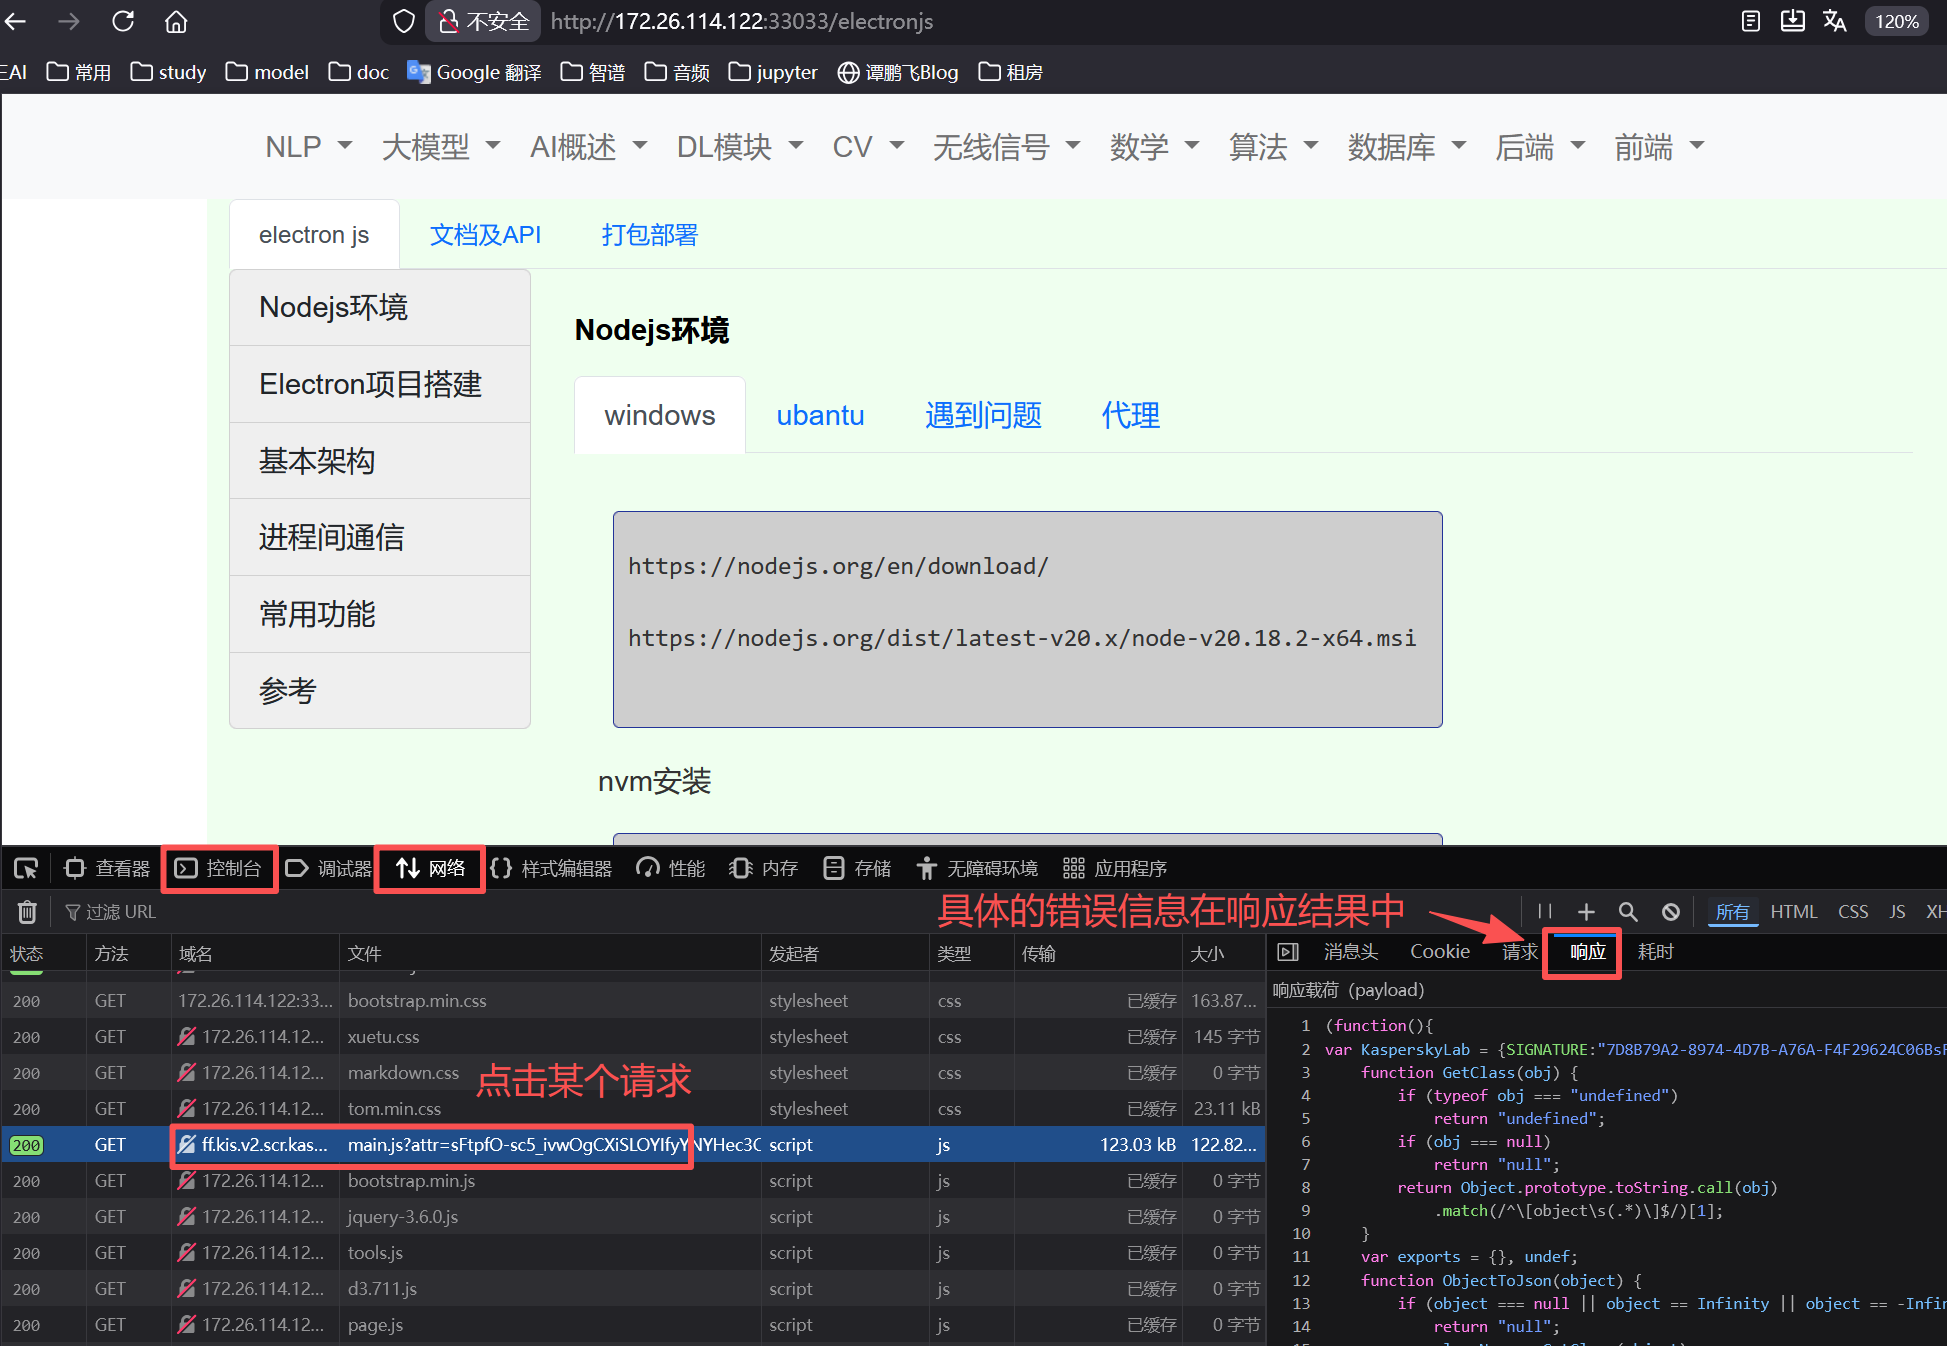
- 控制台 - 会有部分错误信息,通过会定位到文件 - 网络 - 包含具体的请求信息 |
|
|
|
|
|
|
|
|
功能·远程控制
|
根据你的需求,我整理了两个使用 **Rust** 语言开发的开源远程桌面控制项目。其中一个是功能完备的“全栈”解决方案,另一个是专注于特定协议和平台的“专业”型工具。
### 🥇 RustDesk:全功能远程桌面
这是目前最受欢迎、生态最完善的 Rust 远程桌面项目,也是绝大多数情况下的首选。
* **项目简介**:一款开箱即用的远程桌面软件,可以作为 TeamViewer 和 AnyDesk 的替代品。它支持自建服务器,让你完全掌控数据。
* **核心优势**:
* **跨平台**:支持 Windows、macOS、Linux、iOS、Android 等所有主流平台。
* **数据主权**:支持完全自托管,你可以搭建自己的`hbbs`(ID/中继服务器)和`hbbr`(数据中继服务器),确保所有连接数据都由自己掌控。
* **安全加密**:默认使用端到端加密(如 ChaCha20-Poly1305),保障数据传输安全。
* **功能全面**:除了基础远程控制,还支持文件传输、声音传输、远程命令行、TCP 隧道等功能。
* **适用场景**:个人跨设备办公、企业 IT 内网支持、对数据隐私有严格要求的场景(如金融机构)。
* **GitHub 仓库**:`rustdesk/rustdesk`
* **从源码编译(以Linux为例)**:
```bash
# 1. 克隆仓库(包含子模块)
git clone --recurse-submodules https://github.com/rustdesk/rustdesk
cd rustdesk
# 2. 安装 Rust 工具链和系统依赖 (以 Ubuntu 为例)
curl --proto '=https' --tlsv1.2 -sSf https://sh.rustup.rs | sh
source $HOME/.cargo/env
sudo apt install -y g++ cmake libgtk-3-dev libxcb-randr0-dev libxdo-dev libxfixes-dev libasound2-dev libpulse-dev
# 3. 构建 Release 版本
cargo build --release
# 编译后的可执行文件位于 ./target/release/rustdesk
```
### 🛠️ lamco-rdp-server:RDP协议服务器
这是一个比较新锐的项目,如果你需要的是一个**标准的RDP服务器**(特别是运行在Linux Wayland环境上),那么它会是一个非常专业的选择。
* **项目简介**:一个运行在 Linux 上的原生 RDP 服务器,特别为 **Wayland** 显示服务器设计。它使用标准的 RDP 协议,因此可以用 Windows 自带的“远程桌面连接”等客户端直接连接。
* **核心优势**:
* **标准协议**:基于 **IronRDP** 协议栈实现,兼容所有标准 RDP 客户端(如 `mstsc`、Remmina),无需安装特定客户端。
* **Wayland原生**:完美支持 GNOME、KDE 等现代 Linux 桌面环境下的 Wayland 会话,并通过 `xdg-desktop-portal` 进行屏幕捕获。
* **硬件加速**:支持 VA-API (Intel/AMD) 和 NVENC (NVIDIA) 硬件编码,性能出色。
* **功能丰富**:支持 PAM 认证、H.264 编码、剪贴板同步、音频转发等。
* **适用场景**:Linux(特别是使用 Wayland 的)用户,需要从任何设备(包括公司 Windows 电脑)通过标准 RDP 客户端进行远程访问。
* **GitHub 仓库**:`lamda/lamco-rdp-server`(注:原始结果中为推测,需搜索确认,但项目名和功能明确)
* **从源码编译(Arch Linux方式)**:该项目通常通过 AUR 安装,但从源码构建的思路类似:
```bash
# 1. 克隆仓库(假设地址)
git clone https://github.com/lamda/lamco-rdp-server
cd lamco-rdp-server
# 2. 安装 Rust 和构建依赖 (如 libxcb, libva, openssl 等开发库)
# 3. 使用 Cargo 构建
cargo build --release
# 编译后的可执行文件位于 ./target/release/lamco-rdp-server
```
### 👀 另一个值得关注的项目:sanzu
在搜索结果中还发现了一个名为 **sanzu** 的项目,它同样由 Rust 编写,是一个“图形化远程桌面解决方案”。虽然它的介绍较少,Stars 数目前约为 200,但作为新兴项目也值得关注,未来可能会发展出独特的优势。
### 💡 如何选择?
* **如果你想找 TeamViewer/AnyDesk 的全面替代品**,需要跨平台支持、功能丰富且能自建服务器,那么首选是 **RustDesk**。它的社区活跃,资料齐全,上手也很快。
* **如果你是一位 Linux 用户**,特别是使用 **Wayland** 桌面,并且希望用系统自带的或标准的 RDP 客户端来远程连接,那么 **lamco-rdp-server** 会更符合你的技术栈,性能和兼容性都更有针对性。
|
|
我来搜索一下GitHub上使用Rust语言开发的远程桌面控制开源项目。
根据搜索结果,我为您整理了GitHub上使用Rust语言开发的主要远程桌面控制开源项目:
## 主要项目推荐
### 1. **RustDesk** ⭐ 最热门
- **GitHub**: https://github.com/rustdesk/rustdesk
- **许可证**: AGPL-3.0
- **特点**:
- 开箱即用,无需配置
- 支持自建服务器,数据完全自主可控
- 跨平台支持(Windows、macOS、Linux、Android)
- 提供Web客户端
- 支持文件传输、剪贴板共享、音频重定向
- **架构**: 使用Sciter或Flutter构建GUI,核心逻辑用Rust实现
### 2. **IronRDP**
- **GitHub**: https://github.com/Devolutions/IronRDP
- **特点**:
- Microsoft RDP协议的Rust实现
- 专注于安全性
- 支持多种编解码器(Uncompressed、RLE、RDP 6.0 Bitmap、RemoteFX)
- 提供异步和同步示例
### 3. **rdp-rs**
- **GitHub**: https://github.com/citronneur/rdp-rs
- **Crates.io**: https://crates.io/crates/rdp-rs
- **特点**:
- 纯Rust实现的Microsoft远程桌面协议
- 附带客户端实现 `mstsc-rs`
- 专注于安全性和跨平台
- 约5K行代码,MIT许可证
### 4. **rustdesk-server**
- **GitHub**: https://github.com/rustdesk/rustdesk-server
- **特点**:
- RustDesk的专用服务器端实现
- 包含ID服务器(hbbs)和中继服务器(hbbr)
- 支持Docker部署
- 提供二进制发行版
## 项目对比
| 项目名称 | 协议类型 | 主要用途 | 活跃度 | 特点 |
|---------|---------|---------|-------|------|
| **RustDesk** | 自有协议 | 完整远程桌面解决方案 | ⭐⭐⭐⭐⭐ | 功能最全,社区最大 |
| **IronRDP** | Microsoft RDP | RDP协议库/客户端 | ⭐⭐⭐⭐ | 企业级RDP实现 |
| **rdp-rs** | Microsoft RDP | RDP协议库 | ⭐⭐⭐ | 轻量级,适合研究 |
| **rustdesk-server** | 自有协议 | 服务端部署 | ⭐⭐⭐⭐⭐ | 配合RustDesk使用 |
## 建议
- 如果您需要**完整的远程桌面解决方案**,推荐 **RustDesk**,它是目前最成熟、社区最活跃的Rust远程桌面项目
- 如果您需要**与Windows RDP服务器交互**,推荐 **IronRDP** 或 **rdp-rs**
- 所有项目都支持编译为原生二进制文件,符合您的"编译类"要求
|
|
|
|
|
|
|
|
|
|
|
|
|
参考